Trampoline with Net
Why Choose Us
Rich Experience
As a result of our commitments and efforts, our excellent products and service as well as our idea have returned us with great reputation from users and clients at home and abroad.
Customized services
Our company has established its after-sales parts warehouses to completely improve its after-sales repair response speed.
Production Market
Up to now, The export business has covered more than 100 overseas countries and regions.
Our Product
Trampoline, Piltaes, Exercise Bikes, Stepper Machines.
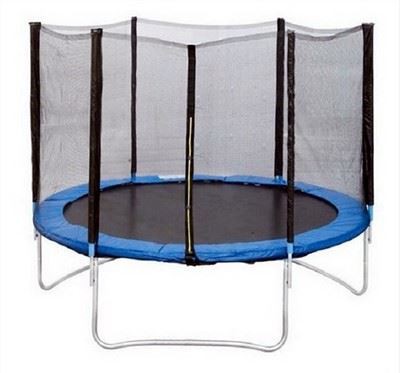
What is Trampoline With Net?
A trampoline safety net, also referred to as trampoline safety enclosure, is a trampoline accessory that greatly reduces the chance of fall off and frame impact injuries. It is the most commonly used safety accessory amongst all the other safety measures.


Product Categories


Features to Look For Trampoline With Net
Properly sized for your trampoline
The net should extend over the edges of the trampoline mat by at least 5 to 8 feet to prevent falls. Measure your trampoline and choose a net specifically designed for that size. An improperly sized net will only provide partial protection.
Strong, durable material
Look for a net made of high-density polyethylene or polypropylene mesh. These rugged materials can withstand weather, UV rays, and high impacts. Avoid nets with large mesh openings, as little fingers and toes can get trapped. Stronger nets may cost a bit more but will last much longer and provide superior safety.
Securely attaches to the trampoline frame
The net should attach securely around the trampoline frame, preferably with a strong rope or cord. This prevents the net from sagging or drooping, which could allow falls through gaps. Some nets use metal or plastic clamps to securely fasten them to the frame. Avoid nets that rely on elastic or bungee cords, as these can become loose over time.
Has an entrance with a secure closure
A zippered entrance in the net allows easy access to the trampoline but needs a sturdy closure to prevent falls. Look for a heavy-duty zipper at least 8 to 10 inches long and secure straps or Velcro closures over the zipper flap. This deters little ones from opening and closing the entrance unsupervised.
Meets or exceeds safety standards
Reputable brands will clearly state that their trampoline nets meet official safety standards. These standards help ensure the netting is made of appropriate materials and is appropriately designed to prevent injuries. Only settle for a net with stated safety certifications.

Set Clear Rules
Lay down some ground rules before allowing children on the trampoline. Only one child is allowed to bounce at a time. No rough play, pushing or pulling each other. Only somersaults or flips with proper training. Always jump in the centre of the mat, away from the springs and frame. Only children of similar size and age should jump together. These rules will help prevent injuries from collisions, falls and getting limbs caught.
Closely Supervise
Never leave children unsupervised on a trampoline. Watch them at all times to ensure rules are followed. You need to be present to spot them in case they lose balance or land incorrectly after a jump. Supervision lets you control how many children are on at once and determine when they’ve had enough. Even with safety trampoline net and padding, trampolines can be dangerous if children are left unattended.
Set Time Limits
Limit the time children spend jumping to prevent fatigue and reckless behaviour. Start with 10-15 minutes at a time, a few times a week. Make sure children take breaks in between to rest and rehydrate. You can gradually increase the time as they get older and more experienced. But even for teens, 30-45 minutes at a time is plenty.
Enforce Proper Landing Position
The key to safe trampolining is landing properly after each bounce. Teach children to land with knees slightly bent, back straight and arms out to help balance. Have them practise the proper position before starting to jump. Remind them after each bounce to ensure it becomes second nature. Landing correctly will prevent strains, sprains and fractures from awkward landings.
How To Set Up A Trampoline Net
Step 1: Choose the Right Trampoline Net
Before embarking on the installation process, it’s crucial to select the appropriate trampoline net that suits your specific trampoline model. Here are some key factors to consider when choosing the right trampoline net:
Compatibility: Ensure that the trampoline net is compatible with the size and shape of your trampoline. Whether you have a round, rectangular, or oval trampoline, the net should be designed to fit seamlessly.
Material Quality: Opt for a trampoline net constructed from durable, UV-resistant materials such as polyethylene or polypropylene. These materials offer excellent strength and longevity, ensuring the net can withstand outdoor elements.
Mesh Density: Check the mesh density of the net to ensure it provides a safe enclosure without obstructing visibility. A densely woven net offers enhanced safety by preventing limbs from getting caught while allowing for clear visibility.
Entrance Design: Consider the entrance design of the trampoline net. Look for a net with a secure zipper or latch mechanism to prevent accidental openings during use.
Manufacturer Recommendations: Adhere to any specific recommendations provided by the trampoline manufacturer when selecting a compatible net. Following their guidelines can ensure optimal safety and performance.
Step 2: Gather the Necessary Tools and Equipment
Before commencing the installation of your trampoline net, it’s essential to gather all the required tools and equipment to streamline the process and ensure a smooth setup. Here’s a comprehensive list of the essential items you will need:
Trampoline Net: Ensure you have the correct trampoline net specifically designed for your trampoline model, with all necessary components included.
Hardware and Fasteners: Check that you have all the required nuts, bolts, screws, and any specialized fasteners needed for securing the net in place.
Assembly Tools: Gather a set of basic tools, including a screwdriver, wrench, pliers, and possibly a rubber mallet, to aid in the assembly process.
Ladder (if applicable): If your trampoline requires a ladder for access, ensure that it is included and readily available for installation.
Protective Gear: It’s advisable to wear protective gloves and safety goggles during the installation to prevent any potential injuries from sharp edges or flying debris.
Assistance: If possible, enlist the help of a friend or family member to assist with lifting and positioning the trampoline net, making the process more manageable.
Step 3: Prepare the Trampoline
Before installing the trampoline net, it’s crucial to prepare the trampoline and its surrounding area to ensure a safe and effective setup. Here are the essential steps to prepare the trampoline for the net installation:
Clean the Trampoline: Thoroughly clean the trampoline frame and jumping mat to remove any dirt, debris, or moisture that may have accumulated. A clean surface will facilitate a secure and stable attachment of the trampoline net.
Inspect the Frame and Springs: Carefully inspect the trampoline frame and springs for any signs of wear, damage, or rust. Replace any worn or damaged components to maintain the structural integrity of the trampoline.
Clear the Surrounding Area: Remove any obstacles, such as furniture, toys, or garden tools, from the immediate vicinity of the trampoline to create a safe and unobstructed workspace for the installation process.
Level the Ground: Ensure that the trampoline is positioned on a level surface to prevent unnecessary stress on the frame and ensure stability during use. Adjust the placement as needed to achieve a level orientation.
Secure Anchors (if applicable): If your trampoline includes anchor kits for securing it to the ground, ensure that they are properly installed and tightened to enhance stability, especially in windy conditions.
Step 4: Install the Trampoline Net
With the trampoline prepared and the necessary tools at hand, it’s time to embark on the installation of the trampoline net. Follow these step-by-step guidelines to effectively install the net onto your trampoline:
Positioning the Net: Unfold the trampoline net and identify the designated entrance. Position the net around the outer perimeter of the trampoline, ensuring that the entrance aligns with the ladder or access point.
Attaching the Net to the Poles: Secure the top of the net to the designated poles or enclosure system of the trampoline. Follow the manufacturer’s instructions for attaching the net securely, ensuring a snug fit without excessive tension.
Aligning the Bottom of the Net: Gradually work your way around the trampoline, aligning the bottom of the net with the frame and ensuring that it is evenly distributed. This step may require assistance to achieve a uniform and taut positioning.
Connecting the Bottom of the Net: Fasten the bottom of the net to the trampoline frame using the provided fasteners or attachment mechanisms. Ensure that the net is securely attached, with no gaps or loose areas that could compromise safety.
Checking the Tension: Verify that the net is uniformly tensioned around the trampoline, with no excessive slack or over-tightening. Adjust the tension as needed to achieve a balanced and secure enclosure.
Step 5: Secure the Net in Place
Once the trampoline net is installed, it’s crucial to secure it in place to maintain its stability and integrity. Follow these essential steps to ensure that the net is properly secured around the trampoline:
Inspect Fastenings: Thoroughly inspect all attachment points and fastenings to confirm that the net is securely affixed to the trampoline frame and poles. Tighten any loose fasteners to prevent potential shifting or detachment.
Check Zippers and Entrances: If your trampoline net features a zippered entrance, ensure that the zipper is fully closed and that any additional safety latches are engaged to prevent accidental openings during use.
Verify Latch Mechanisms: For trampoline nets with latch mechanisms, double-check that they are properly engaged and functioning as intended, providing an extra layer of security for the enclosure.
Adjust Tension as Needed: Reassess the tension of the net and make any necessary adjustments to ensure that it remains uniformly tensioned around the trampoline, maintaining a secure and stable enclosure.
Test the Net’s Stability: Gently apply pressure to various sections of the net to assess its stability. The net should remain firmly in place without excessive give or movement, indicating that it is adequately secured.
Step 6: Test the Trampoline Net
After installing and securing the trampoline net, it’s essential to conduct a thorough evaluation to ensure its effectiveness and safety. Follow these key steps to test the trampoline net and verify that it provides a secure enclosure for users:
Visual Inspection: Conduct a visual assessment of the entire trampoline net, checking for any signs of sagging, loose areas, or damage. Address any identified issues promptly to maintain the integrity of the enclosure.
Entrance Functionality: Test the functionality of the entrance, whether it is equipped with a zipper or latch mechanism. Open and close the entrance to confirm that it operates smoothly and securely, without any unexpected openings.
User Accessibility: Verify that the entrance provides easy access for users while effectively preventing unauthorized entry, ensuring that the net serves as a reliable barrier.
Jumping Experience: Encourage a controlled test jump on the trampoline to assess the net’s performance. Observe how the net responds to the impact and movement, ensuring that it remains stable and intact during use.
Supervisory Perspective: Evaluate the trampoline net from a supervisory standpoint, ensuring that it offers clear visibility of the users while effectively containing them within the enclosure.
Why do people use trampolines without enclosures instead of buying a trampoline with enclosure safety?
Cost: Trampolines with enclosures tend to be more expensive than those without enclosures. Some people may opt for a cheaper option to save money.
Space: Trampolines with enclosures can take up more space due to the added height of the enclosure. For those with limited space in their backyard, a trampoline without an enclosure may be a more practical choice.
Preference: Some users may feel that enclosures restrict movement or visibility while bouncing on the trampoline. They may prefer the feeling of openness that comes with a trampoline without an enclosure.
Maintenance: Trampolines with enclosures may require more maintenance and care due to the additional components. Some users may prefer the simplicity of a trampoline without an enclosure.
Our Factory
1. With the world class advanced technology and modern laser cut equipment imported from Germany to insure the accuracy .It is guaranteed that all the tube be formed R arc without acute angle .
2. The automatic welding robot imported from Japan is adopted to the welding work to guarantee the high accuracy and artistic of the welding spot, the security and stability is secured.
3. Excellent surface treatment craft is realized by applying the advanced Static electricity spraying technology through double baked and double painted to guarantee the finish and durability.

FAQ
As one of the leading trampoline with net manufacturers and suppliers in China, we warmly welcome you to buy or wholesale cheap trampoline with net for sale here from our factory. All customized products are with high quality and competitive price.
very big trampoline, 14FT Outdoor Trampoline with Safety Net, big trampoline